Search This Blog

Tuesday, May 31, 2011

A baby quilt


My husband's nephew and his wife are expecting twins this summer so I thought it'd be nice to make a quilt for the boys to play on. After looking at my stash I realized I have absolutely no prints for little boys.  Hmmmm.  The only thing I had was this non-gender specific animal print, so by default it was my starting point.  Pulling some other fabrics out, this was my palette.


I've been wanting to do a stacked coin quilt and I was able to find the brown coordinating print for the zoo animals.  I know they are flowers, but they are cute.  I've been wanting to do a stacked coin design. The coins range in size from 2-8". 


 I used the blue print for the back.

I used one of my new bojo labels.  Bojo are the first two letters of children's names. 
 I hope the twins will have many wonderful times on this quilt made with love by their Aunt Kelly. 

Wednesday, May 25, 2011

Test tiles from the kiln

Well, I finally got my kiln repaired.  He needed to put in a whole new bottom in the kiln because the glass that had fused on it was too deep.  He also needed to replace the lower heating element.  So, I guess it's about as good as new as it can be. 

I made my first test glazes, 500g of 7 glazes: Randy's Red, Narragon White, Opal, New Blue, Floating Blue, Nickel Matt, and Cream Breaking Rust.  It was exciting to do my first kiln firing of some test tiles.  Here are the glazes:
 Left: Nickel Matt     Center: New Blue       Right: Cream Breaking Rust

Left: Randy's Red                Center: Narragon White           Right: Opal
Left: Opal over New Blue   Center: Opal over Randy's Red   Right: Narragon White over Nickel Matt

I made several other glaze combos....some were really ugly.  But, I figure it's best to save all of them.  Don't want to make the same mistake twice. :)

My favorites are Opal, Cream Breaking Rust and Narragon White. I made up 6000g batches of these three.  My Randy's Red doesn't look exactly like Pam's. It's a bit browner.  I gave her a test tile to fire in her kiln, so I will be able to tell if it is the glaze formulation or the kiln.

New Pottery Studio

I took plenty of pictures during the storeroom to studio transformation and thought I downloaded them onto my computer, but I can't find them in any files.  And I've deleted them off my camera.  Has that happened to you?  It's too bad, because the difference in this area of our house is amazing.   But, here are some pictures of the studio. 

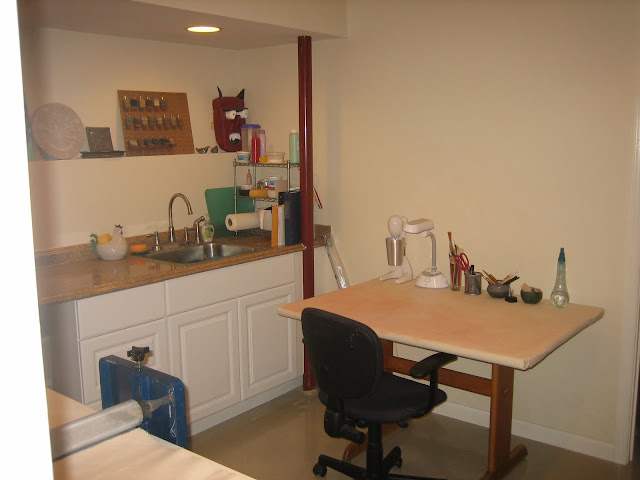
Here is a view from the doorway.  My wonderful sink area.  The ledge above the sink was necessary because of the new water line for the sink, but has come in handy, don't you think?  Also, notice the red support column.  This is supporting a structural beam and couldn't be moved.  Unfortunately, it was in the way of my counters, so I just cut around the beam.  Lol.  I actually love it that way.  The workman wanted to repaint the column, but I thought it was great just the way it was.   I don't have pulls on the cabinet doors yet....still on the to-do list.  And don't you love the paper mache mask that Jordan made when she was in middle school.  It had to come into the studio. 

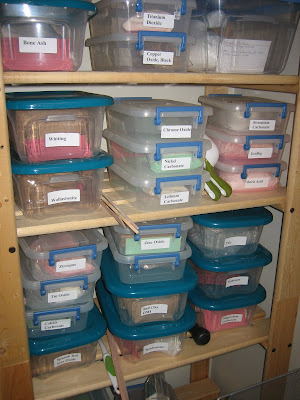
To the right of my work table are the adjustable shelves X B made for me.   And through that door is my smaller, improved, well-lit storage room.  Love it....now it's not spooky to look for stuff in there.  I used to swear there was someone living in our old store room and had to really psyche myself up to go in it. 
(shelves of bins in new storeroom)

This is my wonderful new slab table!  Look at Baxter on the left....he looks like he got caught in the act of doing something naughty. 

To the right of the slab table is an under the stair storage area for all my glaze chemicals:


And most importantly, is a designated area for Baxter to lie down while watching me play with clay.  Hope you enjoyed seeing my new space.  I'm still pinching myself.  Ouch!


More pottery pieces

These are the last pieces I made at Pam's studio.  Neither of them came out well.  The glaze is really muddy looking and didn't break well. 


Thank goodness for opal glaze.  This small plate came out fine.


Tuesday, May 24, 2011

More pottery

This is the little plate I made using some underglazes and a black underglaze pen.  My goodness, that underglaze pen was tough.  It has 4 different tip sizes, but it is difficult to control and will suddenly spurt a big glob of underglaze.  Yuck.  It was bisque fired to cone 06, then glazed with clear aand fired to cone 6.  I was surprised how brown the background clay came out. 


I actually made the next bowl over 5 years ago at Pam's.  I used to go to her house once a week for a pottery lesson until Boone got sick.  It wasn't until about 9 months ago that I started trying pottery again.  I added the little trim around the rim.  It's glazed in Randy's Red.  It's ok, but it has so many imperfections, it's not a fav of mine. 


New pottery pieces

Thought I'd post some of the pieces I have been working on at Pam's studio.  First is a plate I made, a knock off of something I saw in a catalog.  I call it "Starburst". 


I glazed it in Lucero White which broke very nicely at the edges.  I had intended to center the starburst on the plate, but it isn't and I like it much better off-center. 

Then I made a small square tile using the same concept.  It's glazed in Randy's Red.  I'd like to make a set of coasters like this. 

Back in January I posted some pics of a couple birds I made.  These are now glazed.  One has a matt green head with opal body. The other is all opal.  I like them. 

Monday, May 23, 2011

Where have I been?

My goodness, it's been over 3 months since I posted.  Well, what happened is that I decided to convert the store room to a pottery room.  Very exciting, but in the process the basement was a dusty mess, so I had to put away the sewing machine and all my fabrics. 
The pottery room took about 4 weeks to complete and after it was finished I needed to go through all the junk that had been in the store room.  Much of it was thrown or given away, but the remainder was organized into bins and put on shelves in the new, improved, smaller store room.  The store room is now half its original size, but has twice the lighting, painted walls, and a nice epoxy floor.  I love it!  I have photos and will post them soon.  

So, what's the pottery room like?  First of all, it's small.  Enough for me, and maybe one other person, but that's pushing it.  The room is about 8' x 11'.  I had a sink installed, which was relatively easy because there is a bathroom on the otherside of the wall.  I can't fathom how some people can play with clay without running water.  I put in 6 recessed lights so the room is nice and bright.  I bought a table off craigslist and covered it with canvas for a work area.  X B added two sets of adjustable shelves, which I have already crammed with supplies.  One of my pottery buddies was selling her old slab roller, so I jumped on that like a flea on a dog.  X B just finished making me a wonderful table for the slab roller.  It works like a dream.  I love it and appreciate all his work. Under the stairs I have a little storage area for glaze chemicals.  So, I've had the room for about a month now and I am still pinching myself.  I can't believe I have this wonderful space.  I will post photos of this too asap.