I thought I'd make 11 resolutions or goals for 2011.
So here goes:
1. Keep in better touch with friends. Specifically, write, email or call someone I've been out of touch with at least once per month.
2. Handmake at least 4 Christmas gifts for 2011.
3. Complete 1 sewing project every month.
4. Lead a Sunday School Class discussion.
5. Volunteer for Life with Cancer at least 4 times.
6. Donate blood at least 5 times.
7. Walk Baxter at least every other day.
8. Perform a random act of kindness each month.
9. Learn to bake bread.
10. Keep my weight under 165 lbs. (Won't that be difficult eating all that bread I make. :) )
11. Keep up with Quicken. Ugh...I hate dealing with finances.
Joy and Peace to all.
Thursday, December 30, 2010
Thursday, December 16, 2010
Wilhelmina Whale and a platter
So I picked up my whale bank today from Pam's. All in all, I am pleased with it. I love the deep, rich blue (same glaze as the blue bird ornament I made). And there is a spot of glaze on the top that actually looks like a blow-hole. That worked out nicely. But, the white underside didn't come out as nice as I had hoped. I think I should have used a white glaze, not an underglaze. I also should have painted his whole mouth white....maybe a little above it, because some blue glaze ended up in her little grin. The hole on the bottom seems to be the right size; maybe a tad big, but it'll work. I sure hope Zoe likes her new bank.


I also have some photos of a platter I did. I love, love how the glaze came out on it. The platter is about 12 inches long. I glazed one end of the platter Randys Red. On the other end I dipped into Nickel Matte, covering part of the red. Lastly I put an Opal glaze over part of the Nickel Matte. The colors here are pretty true. From left to right: Opal over Nickel Matte, Nickel Matte, Nickel Matte over Randys Red, and Randys Red.
Pam makes great glazes! Really love the colors and plan to do more with these same ones.


Wednesday, December 15, 2010
First Snow and Bird Ornaments
We spent a wonderful weekend at the cabin and even got to enjoy the season's first snow.


Today I attacked the urine spots again. They are better, but the urine smell is still there. Argghhh!
I finally hung the bird ornaments. J saw them when she came home from Auburn...thought they would be ok for Etsy....I wish.


I still wasn't able to photograph the blue one well and it is such a beautiful blue.

 I finished reading Unbroken by Laura Hildebrand. Excellent book; it's hard to believe that Louie went through such an ordeal during WWII. I found especially interesting how Louie dealt with life after returning home. He didn't want anything to do with the church and he was consumed with trying to exact revenge on his POW captor. Then he went to a couple of Billy Graham seminars and remembered a promise he made while floating on a raft in the Pacific Ocean....that he would devote his life to God. It turned his life around.
Makes me think.....

I just love seeing the first snow and tried to get a few pictures of Baxter in the snow. Not much success there. This one by the fire came out better.

I tried to take a picture of how beautiful the snow was dripping off the pine tree, but since this was taken with my cellphone the quality isn't very good.

On the way home I picked up a "new" used crate for Baxter so we won't have to lug his back and forth to the cabin. I've been looking on Craigslist around here and haven't been able to find anything under $40. But, this guy in Staunton was selling one for $30, so I nabbed it. It's a bit smaller than the one here, so it should also be easier for traveling.
Since I'm talking about my sweet dog...I should also say that I'm mad at him. Yesterday, I was cleaning the two extra bedrooms and saw a little yellow spot on the carpet. And then I saw another larger yellow spot. Pee! When we adopted Baxter a year ago, we had a hard time getting him house trained, but I really thought this was behind us! I pulled out the trusty Little Green Machine, but for some reason, it wouldn't suction properly and just spread the urine spots. I must have used 49 paper towels trying to dry the spots.


Makes me think.....
Thursday, December 9, 2010
Reflections
I had coffee with a few of my friends from The Compassionate Friends this morning. The Compassionate Friends....the group no one wants to be a member of. I always am glad to get together with this group of women though. They are the only people that really, really understand what I am feeling. There are no judgments, only complete love from them. Any of us can express our rawest emotions and no one says that we should be "over it by now". I am really grateful for The Compassionate Friends.
The afternoon was clay play-time! It felt so good to get my hands muddy. Wilhelmina Whale got glazed. Last week I had applied a white underglaze on her belly and Pam fired her over the weekend. Today I put a clear glaze and wax over the white. Then I painted her eyes with some white glaze and waxed them. I guess I was a little sloppy when applying the wax because when I dipped her in New Blue glaze there were some small areas where no glaze stuck. Oh well. And I'm a little afraid that I cut the hole in the bottom too large because the stopper isn't even close to fitting. Hopefully she'll shrink quite a bit more in this next firing. I should be able to post a photo of the final product next week. Crossing fingers that she looks good!
The afternoon was clay play-time! It felt so good to get my hands muddy. Wilhelmina Whale got glazed. Last week I had applied a white underglaze on her belly and Pam fired her over the weekend. Today I put a clear glaze and wax over the white. Then I painted her eyes with some white glaze and waxed them. I guess I was a little sloppy when applying the wax because when I dipped her in New Blue glaze there were some small areas where no glaze stuck. Oh well. And I'm a little afraid that I cut the hole in the bottom too large because the stopper isn't even close to fitting. Hopefully she'll shrink quite a bit more in this next firing. I should be able to post a photo of the final product next week. Crossing fingers that she looks good!
My First Quilt
About 3 years ago, my husband, parents and in-laws spent waaayy toooo much money on a new sewing machine for me. It's a Bernina Aurora 430. It does things I don 't even know I want to learn about. I took a class to learn how to use it, but never really used it for anything other than mending and making window treatments. So, about 5 weeks ago, I was just looking through various blogs when I came across one called Obsessively Stitching by a super talented woman named Care. Care had posted a tutorial called First Quilt Ever.
She was going to teach how to make a quilt.....step by step. It was several months old, so I could read all the steps at once and I was immediately hooked! I just had to try making a quilt. So, following her instructions, off I went to JoAnns. I didn't even know where one was, but lo and behold, one is only 2 miles from my house, right next to one of my favorite stores, T J Maxx. Who knew? So these are the fabrics I brought home. I heeded her instructions and didn't buy any stripes or plaids.

I dove in and following Care's super good, easy-peasy directions I was on my way. I did take some pics along the way, not even really knowing what I'd do with them. And, boy, I'm glad I did, cuz now I can post them.
Here is one of my block assemblies:

Unfortunately, I don't have any other pictures until I assembled the top. But, believe me, it was as simple as pie. I had no idea how all those little squares and rectangles were made.

Here's the strip for the backing, but I don't actually have a picture of the final backing:

Then I had a problem. Care suggested that I tape the backing, batting, top assembly to a tile floor so I could pin-baste it. The problem is that every room in my house is either carpeted (that wouldn't work because I would end up pinning the quilt to the carpet) or has hardwood floors (imagine the scratches if I pinned on that!)....except the bathrooms. So, there I was trying to tape this quilt to my bathroom floor. I mean it took up almost the entire space... I had to crawl under the counter to get to one side of the quilt in order to pin. Note the quilt taped right next to the lovely shower and cabinets. lol. :)

Anyway, I finally succeeded in pinning the quilt. Oh, and by the way, Care doesn't warn you how much your knees will hurt after kneeling on that tile.
Then I froze. I didn't have the courage to do the machine quilting. So, the whole assembly is still sitting on the guest room bed waiting for me to get my confidence up to quilt it. I decided to make a little autumn runner first and quilt it. Good thing I did because I did mess up in the quilting. I didn't realize that part of the backing got folded over. I don't think you can fix that, but I've heard that once you wash a quilt you may not notice it as much. Then I decided to make the Christmas table runner. I didn't mess up on that, but it was straight line stitching with a walking foot, so it wasn't a problem.
Anyway, thanks to Care, I'm now eager to do more quilting/sewing projects. So, Santa, if you're listening, please bring this girl some fabrics and notions this year.
Joy and Peace,
kelly
Wednesday, December 8, 2010
Christmas Table Runner
I saw this really cute, cute Halloween table runner on this great blog, Pleasant Home. Here is the link. Isn't it the greatest quilted pumpkin runner you ever saw?
As soon as I saw it I knew I wanted to try to make a Christmas one for myself. Problem is I have only made 2 quilted pieces and they had instructions. For this one, I was going to have to figure it out all by my little lonesome self. I wanted to use a solid white background just like the Halloween one and put 3 wonky Christmas trees on it. These are the fabrics I chose:

 I used the 3 prints to cut out the trees.That was a learning experience in itself. I had only worked with squares and rectangles, so I didn't know that I would need to make the
 lower section larger than the one above it. Oops, I've already forgotten what I learned. I needed to make the lower section smaller than the one above it. See the photo. That way, when I sewed them together, I ended up with nice triangles.

Then, the second challenge was to figure out how to attach the white background. I worked in 3 sections, one for each Christmas tree. So, first I cut a piece of white for the left hand side of the tree and attached it...not hard. Then I cut one for the right hand side of the tree. It took a lot of trial and error to figure out how to add the seam allowances. For the white section that has the tree trunk, I could never figure out how to sew the trunk into the white fabric....I ended up appliquing it onto that section. Lastly, I sewed the tree section to the trunk section. I kind of wanted it to end up more off-center to emphasize the wonkiness, but it's alright.

 Then I sewed all three trees together.Things that I needed to be careful of: making the horizontal seams nice and straight and parallel, making the vertical seams vertical, evenly spacing the trees, and having about the same amount of white fabric outside the outer trees.
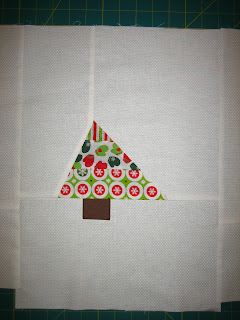
 Then I cut batting and backing fabric about two inches larger than the front. I loved how the pumpkin runner was quilted in straight lines, alternating the direction of each section. So, I decided to quilt the outer trees horizontally and do the middle section vertically. The quilt lines are about 3/4 inches apart. I used the same backing fabric for the binding, but made it kinda scrappy by inserting small sections of the tree fabrics. Here is the final product:


 Oh, and, noone told me I'd need a walking foot to quilt this. This wasn't included in my fancy, dancy sewing machine. So, I called the local Bernina shop to ask how much they were. I almost had a heart attack. I had no idea an attachment could cost so much. But they did have a 25% coupon, so I guess I just suffered a stroke.
I like the runner, but there is one problem I should have thought about. I didn't wash the red backing fabric beforehand and it bleeds when wet.....SO, I guess I will never be able to wash this runner....need to keep my fingers crossed that noone spills on it. lol.....oh well, it was a fun learning experience.
Joy and Peace,
Kelly
As soon as I saw it I knew I wanted to try to make a Christmas one for myself. Problem is I have only made 2 quilted pieces and they had instructions. For this one, I was going to have to figure it out all by my little lonesome self. I wanted to use a solid white background just like the Halloween one and put 3 wonky Christmas trees on it. These are the fabrics I chose:


Then, the second challenge was to figure out how to attach the white background. I worked in 3 sections, one for each Christmas tree. So, first I cut a piece of white for the left hand side of the tree and attached it...not hard. Then I cut one for the right hand side of the tree. It took a lot of trial and error to figure out how to add the seam allowances. For the white section that has the tree trunk, I could never figure out how to sew the trunk into the white fabric....I ended up appliquing it onto that section. Lastly, I sewed the tree section to the trunk section. I kind of wanted it to end up more off-center to emphasize the wonkiness, but it's alright.


I like the runner, but there is one problem I should have thought about. I didn't wash the red backing fabric beforehand and it bleeds when wet.....SO, I guess I will never be able to wash this runner....need to keep my fingers crossed that noone spills on it. lol.....oh well, it was a fun learning experience.
Joy and Peace,
Kelly
Saturday, December 4, 2010
Headbands!
I decided to try to make a few headbands for J. She went through my fabric piles and chose some she liked. I followed this tutorial from Old Red Barn Co, so she gets all the credit for how to make these.
 For the first headband, I followed the tutorial exactly, but J wanted a narrower one. So, for the next one, I cut my strips 3" wide. I didn't want to make the narrow part any smaller, so I didn't cut over 1 inch or i would have ended up with only 1 inch on the narrow end. I just cut at an angle to still have 2 inches at the top. J also wanted her headband a little tighter. I tried cutting a piece of elastic that was about 2 1/2 inches long, but it ended up WAY too tight. So, I left it 3 inches long and just inserted it further into the headband. I think she was pleased with the 3rd headband. It was the only one that made the final cut. LOL. They were fun to make though.

Friday, December 3, 2010
Some new pieces
Was able to put some underglazing on the whale bank yesterday. It is going in the kiln this weekend so I should be able to finish glazing it next week. Keeping my fingers crossed that I like the final product.
I was also able to pick up a few pieces I made. The first is a tile dogwood blossom tile. Some photos:


I am pretty happy with this tile. I had problems with the background glaze. It flaked as I applied it. Pam thought it would still come out ok. I'm not crazy about the color though. I am thrilled that the stamens (is that what you call the center of the flower? I can't remember) stayed attached. I was afraid they would break off somewhere in the process.
I also made a couple birds that I want to make into ornaments. The lighting isn't very good, so I'm going to try to take more pictures later. I love these little birds. The blue color of the first one is so, so rich and deep. Love it. It feels so, so good to make something. Pottery is so cool because you just don't know what it's going to look like when it comes out of the kiln. Maybe I'll give them away as Xmas gifts.


Sunday, November 28, 2010
Wilhelmina the Whale
One of my friends has her own studio and makes the coolest pottery. When I expressed interest in her work, she asked if I wanted to give pottery a try. That was about 5 years ago. Let me say, I am not, NOT, a naturally creative person. It takes a lot of work to get the creative juices to flow. But I gave it a try...for a few months. Then, one day, those swirling waters of life threatened to drown me... I found out my son had leukemia. And, all my energies went towards taking care of my son.
Flash forward to last September when Pam asked me if I was interested in coming back to her studio. I was interested, but I am not the most patient person. I realize Pam has been at this for 15 years, but I want to be able to make pieces like hers TODAY. Not 15 years from now. Is anyone else out there like that?
Well, I am back at her studio. I decided it would be fun to make a bank for my young niece for Christmas. (My 53 year old brother had his first child this year!) The bank is shaped like a whale... Wilhelmina Whale is her name. Here is a photo of it in its current state.

She is drying. I'm hoping to be able to put some underglazing on her this week. I'm pretty happy with her. She's not perfect.....but neither am I, right?
Joy and Peace,
Kelly
A Flowing Stream
The quote under my profile is from the movie "The Bucket List". My life is a stream that sometimes flows quickly, the waters swirling so rapidly that I feel I am drowning. Other times my life feels almost like stagnant waters, slow flowing and thick with scum. I am searching for ways to keep my life flowing free, fresh and clear.
The past year I've taken up yoga, quilting and pottery. Each of these activities have brought me considerable joy and peace. But as 2010 comes to a close and I turn 51, I realize that my waters are pretty murky and I haven't been able to hold onto those comforting feelings.
So, I've decided to use a blog to help me reflect on my journey. Maybe by posting some of my thoughts, projects and activities, I can help still the waters as I flow towards that mist beyond the falls. Or, depending on where I am, get the waters moving again.
I leave with two questions....Have you found joy in your life? Has your life brought joy to others?
Wishing all joy and peace,
Kelly
Subscribe to:
Comments (Atom)